|
|
Eclipse RDS Support
Remote
Development Services (RDS) lets you access files and data sources
registered in the ColdFusion Administrator on a ColdFusion server.
To use Eclipse RDS Support, you must enable RDS when you install
ColdFusion. With Eclipse RDS Support, you can use Flash Builder
or CFEclipse as your IDE and access ColdFusion files remotely.
Eclipse RDS Support is supported on all ColdFusion server platforms.
Before you install Eclipse RDS Support, you must have the following
installed:
Eclipse 3.1 or later, Flex Builder 2 or later, or Flash
Builder
ColdFusion MX 7.0.1 or later
Configuring RDSBefore using RDS, you must configure ColdFusion servers.
Configure any ColdFusion servers that you want to connect to using RDSIn Flash Builder or Eclipse, select Window >
Preferences > ColdFusion > RDS Configuration.
To configure the default localhost server, select localhost
and specify the following:
Description
Host name (127.0.0.1)
Port number (8500 if you are using the built-in web server)
Context root, if necessary (For more information about the
context root, see Installing ColdFusion guide.)
Password, which is the RDS password
To specify additional servers, click New, and specify the
following:
Description, which can be any name you
want
Host name (IP address or machine name)
Port number (8500 if you are using the built-in web server)
Context root, if necessary
For more information about
the context root, see Installing ColdFusion guide.
Password, which is the RDS password
To remove a server definition, select the server and click
Remove.
To test a connection, select the server and click Test Connection.
Note: If you are using ColdFusion MX 7 or earlier,
the message “The RDS server was successfully contacted, but your
security credentials were invalid,” appears. The message indicates
that the password was not validated, even if it is correct. Click
OK to close the message.
Once you have configured the RDS connection to your CF servers,
you can view the files, folders and data sources on RDS servers.
Each RDS server appears as a node in the RDS Fileview and Dataview,
with the name you specified when you configured the RDS server.
View files and folders or data sources do the followingIn Flash Builder, select Window > Other Views.
In Eclipse, select Window > Show View > Other.
Select RDS.
To access the file system on the RDS server, select RDS Fileview.
To access data sources on the RDS server, select RDS Dataview.
Using the RDS FileviewThe RDS Fileview lists all the folders and files on the
RDS server. You use the navigation buttons as indicated in the following
table:
Button
|
Action
|
|---|
|
|
Refresh the active RDS server.
|
|
|
Create a file in the currently selected
folder.
|
|
|
Delete the currently selected file.
|
|
|
Create a folder in the currently selected
folder.
|
|
|
Delete the currently selected folder.
|
Note: RDS Eclipse Support does not support file operations
such as copy and paste, drag and drop, and changing file attributes.
However, delete, save, save as, and rename are supported. Also,
on ColdFusion servers after ColdFusion 5, the date last modified
field does not appear.
To rename a folder or file, right-click the folder or filename.
Using the RDS DataviewThe RDS Dataview lists all the data sources on the RDS
server. You use the buttons as indicated in the following table:
Button
|
Name
|
Description
|
|---|
|
|
Refresh
|
Refresh the currently selected item.
|
|
|
Query Viewer
|
Opens the RDS Query Viewer.
|
You can build queries using either the RDS Query Viewer or the
Visual Query Builder. The RDS Visual Query Builder is like the ColdFusion
Report Builder Query Builder and the HomeSite Query Builder.
Build and execute a query using the RDS Query ViewerClick the RDS Query Viewer icon on the RDS Dataview
tab.
The RDS Query Viewer opens in its own tab, which means
that if you have other documents open, the RDS Query Viewer has
focus.
Do one of the following:
Enter the SQL, and
double-click the field names and table names as appropriate.
Click the Visual Query Builder button.
For
more information about using the Visual Query Builder, see Using Visual Query Builder.
To try the query, click Execute query.
The first 50
records of the result set appear.
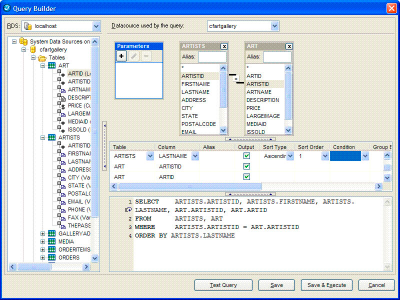
Using Visual Query BuilderYou
use the Query Builder to define a SQL statement. The following image
shows the Query Builder user interface:
Build a SQL statement using the Table pane and the Properties panelExpand a data source.
Double-click the columns to be named in the SELECT statement.
As
you select columns, the Query Builder creates the SELECT statement
in the area at the lower edge of the pane.
If you select columns from more than one table, you must
specify the column or columns used to join them by dragging a column
from one table to the related column in the second table.
(Optional) Specify sort order by doing the following:
Locate the column in the Properties panel.
Click in the Sort Type cell of the column you want to sort
by.
Specify Ascending or Descending.
(Optional) If you specify multiple sort columns, you specify
precedence using the Sort Order cell.
(Optional) Specify selection criteria by doing the following:
Locate the column in the Properties panel.
Click in the Condition cell.
Select WHERE.
Specify WHERE clause criteria in the Criteria cell.
Note: If you specify selection criteria, the Query Builder
creates a WHERE clause. To use an INNER JOIN or other advanced selection
criteria instead, you must code the SQL manually.
(Optional) To specify an aggregate function, GROUP BY, or
an expression:
Locate the column in the Properties
panel.
Click in the Condition cell.
Select Group By or the aggregate function (such as COUNT).
(Optional) To specify SQL manually, type the SQL statement
in the SQL pane.
Note: You code SQL manually to
use an INNER JOIN instead of a WHERE clause, use an OUTER JOIN,
or use a database stored procedure.
(Optional) To specify the data type of a query parameter:
Click the + button under Parameters.
Enter the name of the parameter.
Select the data type.
Review the SELECT statement that displays in the SQL pane,
and use the Table and Properties panes to make adjustments, if necessary.
(Optional) Click Test Query.
Click Save.
|