|
|
ColdFusion/Flex Application wizard
The ColdFusion/Flex Application wizard creates
ColdFusion and Flex files for a create, read, update, delete (CRUD)
application. You specify the master, detail, and master/detail pages
to include in the application, and the relationship between the
application’s pages. The wizard lets you use Visual Query Builder
to generate the SQL statements. For more information about using
Visual Query Builder, see Using Visual Query Builder.
Designing your applicationBefore starting the ColdFusion/Flex Application wizard,
you should determine which pages to include in your application,
including the following:
Whether each page is a master, detail, or master/detail
page
The fields to display in each page
The fields that connect one page to another
In the following example, you create an application for an art
gallery. The first page lists all the artists that your gallery
represents. When a user selects an artist, a page that lists all
the works by that artist appears. When the user then selects a work
of art, a page that contains details about that piece of art appears.
In this example, your application contains the following pages:
A master page that lists the artists
A master/detail page in which the master page lists the works
of art by the artist selected on the List of Artists master page,
and a detail page that contains details about the artwork selected
on the Artwork master page.
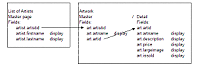
You may find it helpful to draw a diagram of the tables and fields
that you want to include in your application, including which ones
to display in your application, as the following image shows:
Start the ColdFusion/Flex Application wizardConfigure your RDS servers. For more information,
see Configuring RDS.
In Eclipse or Flash Builder, select File > New > Other.
Under ColdFusion Wizards, select ColdFusion/Flex Application
wizard, and then click Next.
After reading the introductory text, click Next.
To load the settings from an application you previously created
using the ColdFusion/Flex Application wizard, select the configuration
file, and then click Load ColdFusion/Flex Application Wizard Settings.
Click Next.
Select the RDS server on which you want the application to
reside.
Specify the data source to use. The data source is configured
in the ColdFusion Administrator.
Although you specify one
default data source at this point, you can access data from other
data sources in your application.
Click Next.
Specifying form layoutThe Form Layout dialog box lets you specify the pages to
use in your application. You can create master, detail, or master/detail
pages. In your application, you can link master, detail, and master/detail
pages as follows:
Page type
|
Can link to
|
|---|
master
|
master
master/detail
detail
master
and detail
master and master/detail
|
master/detail
|
master
master/detail
|
Create a pageClick the plus sign (+).
In the Name text box, enter the name for the page.
Select the page type (master, detail, or master/detail).
Click Edit Master Page, Edit Detail page, or Edit Master
Section, depending on the type of form you are creating.
The
Visual Query Builder starts.
Use Visual Query Builder to specify the data source, tables,
and fields to include in the form, and then click Save to save the
query. For more information about using Visual Query Builder, see Using Visual Query Builder.
Repeat steps 1 through 5 for each form in your application.
Use the right and left arrows to specify the relationship
of the forms in your application. For example, detail forms should
appear indented, directly under the related master form in the Navigation
Tree panel. You drag and drop items to move them in the tree structure.
Click Next.
The Project information page appears.
Specify the following:
The context root, if
applicable
Whether to include a login page in the application
The location of the services-config.xml configuration file
that the project should use
The web root URL
Whether to use an existing or new Flash Builder or Eclipse
project
The project name and the location of the project if it is
new
Click Finish.
The ColdFusion/Flex Application wizard creates the ColdFusion
and Flex files that comprise your application. You can test the
application by clicking the Run Main button in Flash Builder or
Eclipse, or by browsing to the main application page, which is located
at http://<server_name>:<port_number>/<project_name>/bin/main.html.
You can also manually modify the application files as appropriate
for your needs.
Tips for creating applications with the ColdFusion/Flex Application wizardAlthough the ColdFusion/Flex Application wizard greatly
simplifies creating CRUD applications, keep in mind the following
information to ensure that you create the application that you designed.
To adjust UI elements, open the MXML file in Flash Builder
or Eclipse design mode.
When you create a project that has the same name as a project
you previously created, the wizard creates a backup folder that
contains the files from the project you previously created.
If you create a master page and a detail page for a table
in which there is no primary key defined, the wizard selects the
first field in the database as the key value to represent the row.
In master pages, link a field to the Parameters box to add
type validation to the query by using the cfqueryparam tag.
Doing this is optional.
You must select a primary key column in the master form;
the wizard chooses the key by default. If you create a master page
and do not link it to the id property, you cannot add it to the
site tree under another master page.
Deselect the Display column for fields that your application
uses that you do not want to appear in your application.
Specify the sort order for the field by which to sort data
in the page, and specify any other conditions as appropriate.
Change the labels for fields by clicking the field name in
the Label column, and then entering a new field name.
In a detail page, create a combo box that is populated by
dynamic data. To do this, change the value in the Input Control
column for the field to use to populate the combo box to be ComboBox,
click the Input Lookup Query (sub-select) column in that field,
and then use the Visual Query Builder to specify the data to use.
When you create a detail page, display of the primary key
is disabled automatically.
When you create a detail page, input controls are assigned
by default. You can change them from the default values, which appear
as follows:
Boolean and bit values appear as a check
box.
Memo and CLOB values appear as a text area.
Everything else appears as a text input control.
|