Create a CFC that extends the CFIDE.portlets.ColdFusionPortlet package.
For
example, the following HelloPortlet.cfc extends
this package and defines the doView() and doHelp() methods:
<cfcomponent extends="CFIDE.portlets.ColdFusionPortlet">

    <cffunction name="doView" returntype="void" output="true">
        <cfargument name="renderRequest" type="any" required="true" hint="A
        javax.portlet.RenderRequest java object">
        <cfargument name="renderResponse" type="any" required="true" hint="A
        javax.portlet.RenderResponse java object">
        <cfoutput>
            Hello World ColdFusion Portlet
        </cfoutput>
    </cffunction>
    <cffunction name="doHelp" returntype="void" output="true">
        <cfargument name="renderRequest" type="any" required="true" hint="A
        javax.portlet.RenderRequest java object">
        <cfargument name="renderResponse" type="any" required="true" hint="A
        javax.portlet.RenderResponse java object">
        <h1>ColdFusion Help</h1>
        <p>This is a Help message for the Hello Portlet.</p>
    </cffunction>
</cfcomponent>
Save HelloPortlet.cfc in <jboss_server_home>\server\default\deploy\cfusion.ear\cfusion.war\portlets\hello.
Define HelloPortlet.cfc in portlet.xml,
which is located in the WEB-INF folder of ColdFusion web root. The portlet.xml file
looks similar to the following:
<?xml version="1.0" encoding="UTF-8"?>
<portlet-app xmlns="http://java.sun.com/xml/ns/portlet/portlet-app_1_0.xsd"
xmlns:xsi="http://www.w3.org/2001/XMLSchema-instance"
xsi:schemaLocation="http://java.sun.com/xml/ns/portlet/portlet-app_1_0.xsd http://java.sun.com/xml/ns/portlet/portlet-app_1_0.xsd" version="1.0">
    <portlet>
        <description xml:lang="en">This Portlet is a Hello World CF Portlet</description>
        <portlet-name>ColdFusionPortlet</portlet-name>
        <display-name xml:lang="en">CF Hello Portlet</display-name>
        <portlet-class>coldfusion.portlet.ColdFusionPortlet</portlet-class>
        <init-param>
                <name>cfcName</name>
                  <value>portlets.hello.HelloPortlet</value>
        </init-param>
        <supports>
            <mime-type>text/html</mime-type>
            <portlet-mode>VIEW</portlet-mode>
            <portlet-mode>HELP</portlet-mode>
        </supports>
        <portlet-info>
            <title>ColdFusion Hello World Portlet</title>
        </portlet-info>
    </portlet>
</portlet-app>
The portlet is defined and registered
for portlet definition, with targeted cfcName defined as the INIT
parameter. The INIT parameter value must be from the web root of
ColdFusion.
Run the JBoss server by running one of the following commands:
On
UNIX
<JBoss_home>/bin/run.sh
On
Windows
<JBoss_home>\bin\run.bat
By
default JBoss only binds to localhost. You can have it bind to any
IP address by running bin/run.sh -b 0.0.0.0 on
UNIX or bin/run.bat -b 0.0.0.0 on Windows.
Launch the JBoss portal server. By default, JBoss binds to
port 8080, so launch the server using the URL: http://<matching_IP>:<port>/portal/.
For
example: http://127.0.0.1:8080/portal.
Log in to the portal by clicking the login link in the upper-right
corner. The default credentials are admin/admin.
Click the Admin option in the upper-right corner.
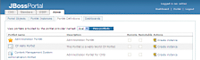
Click the Portlet Definitions tab. The portlet name, CF HelloPortlet
is listed here.
Create an instance of this portlet by clicking Create Instance
under Actions.
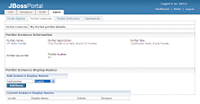
Specify the instance name.
Add the instance display name.
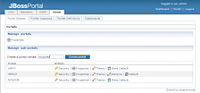
Click the Portal Objects tab.
Create a new portal page by specifying the portal name in
the Create a portal named box.
Select the created portal page from the list of portals.
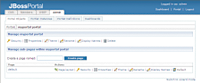
From Actions, select Page Layout.
From the Portlet instance associated with this Window list,
select the portlet instance you created in step 10.
In the Page Layout section, click Add for the center region
or left region to add the portlet container in the required area.
Go back to the Portal Objects > Portals page and select
Make Default option to set the new portal as default.
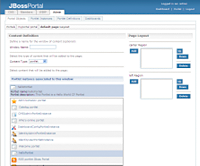
Click the Portal option on the upper-right corner to view
the new portal page containing the portlet.